Attendance System
An attendance and real-time tracking system using RFID.
Overview
My high school's FIRST robotics team had no real way of tracking attendance. Members would show up, put in a few hours, and leave with no record of it. I wanted to fix that, and at some point it turned into a full points-based system with custom RFID cards, a kiosk in the lab, a Flask API, and an admin web panel. Every minute a member is present earns them one point, and administrators can pull up the full attendance history for any member.
The project went through a few iterations before landing on RFID. The first version used QR codes on printed ID cards and a camera on the Raspberry Pi running an OpenCV script to decode them. The codes encoded each student's email prefix, which seemed reasonable until someone pointed out that anyone who knew your email could scan in as you. Switching to RFID fixed the spoofing problem, and disabling copy protection on the chips meant students could not read or clone the data on their own cards.
System Architecture
There are three main pieces:
- A Raspberry Pi running Ubuntu server, the kiosk and card reader
- A Flask API handling all the business logic
- MongoDB storing accounts and attendance data
The Pi and the admin web panel both talk to the same API meaning the Pi never touches the database directly.
flowchart LR
    Card["ID Card\n(RFID)"] -->|scan| Pi["Raspberry Pi\n(scan.py)"]
    Pi -->|eel bridge| Kiosk["Chromium\nKiosk"]
    Pi -->|HTTP :8080| API["Flask API"]
    API --> DB[("MongoDB")]
    Admin["Admin Browser"] -->|HTTP :8080| API
Other than running the web server, scan.py is the main process on the Pi. It runs a loop that reads cards via the PN532 module, fetches the card and user data from the API, posts a check-in, and then calls into eel to update the kiosk display. The Flask API is the single source of truth; everything goes through it.
The scan loop fetches the full card list from the API on every scan rather than caching it locally. For a roster the size of a robotics team this is perfectly fine, and it keeps the Pi stateless; there is no risk of it acting on stale data if a card gets disabled or a new one gets issued between scans.
ID Cards
Since the team already had an ID card printer, I used it. Cards were generated with a Python script using the Pillow library, printed, and embedded with a MIFARE Classic RFID chip. Each card stores a 6-digit numeric ID in block 4 of the chip. That ID maps to a card record in the database, which links to the student's account. This indirection means a card can be invalidated or reassigned without touching the user record at all.
Writing to a card pads the ID to 16 bytes (the size of a MIFARE block) before writing after authenticating with the default key:
BLOCK = 4
data = input_string.encode("utf-8")
padded_data = data.ljust(16, b'\x00')
The write is attempted up to three times with a short delay between each attempt before giving up, which handles the occasional failed write without requiring a manual retry. Card IDs are randomly generated 6-digit numbers guaranteed to be unique across the collection. Cards carry a one year expiration date and stop working after that; members have to get a new one issued each academic year. An administrator can also disable a card at any point through the web panel, which flips the enabled flag on the card document without deleting anything.
An example image of the administrator panel (for a specific member) is below. 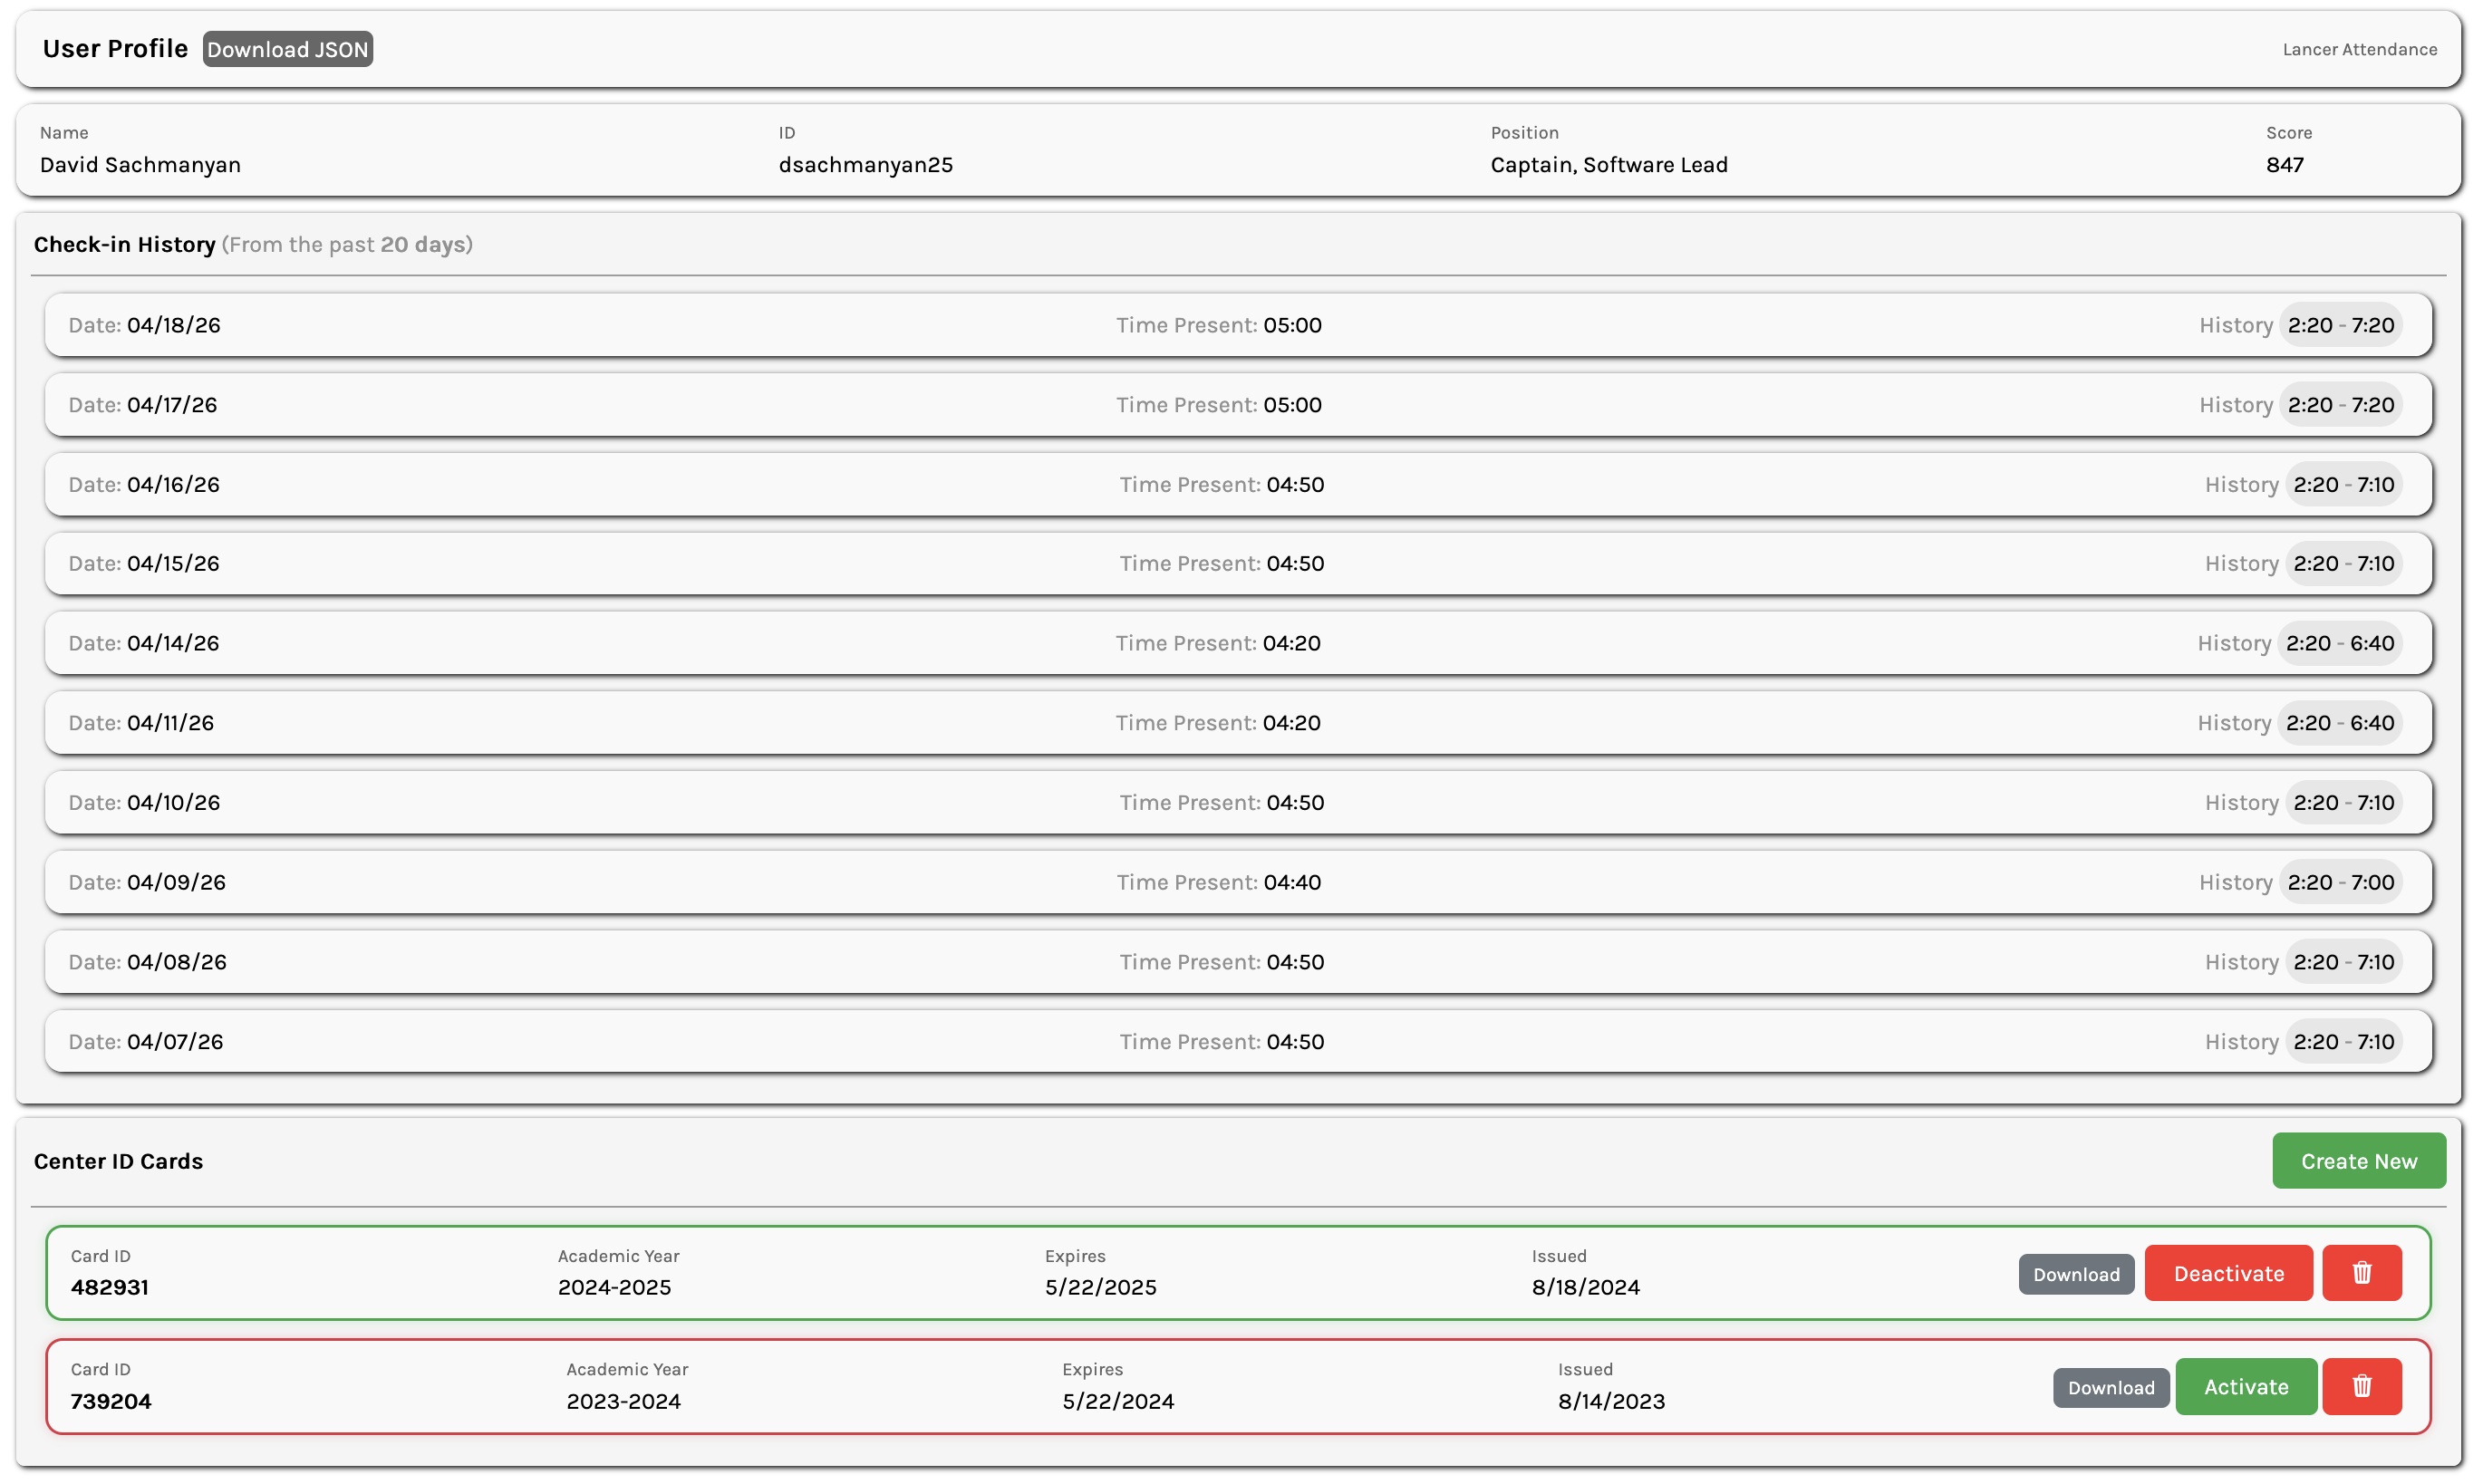
Card Scanner
The reader is a PN532 module connected to the Raspberry Pi over I2C. Initialization is straightforward:
i2c = busio.I2C(board.SCL, board.SDA)
pn532 = PN532_I2C(i2c, debug=False)
pn532.SAM_configuration()
Before reading anything, a len(uid) == 4 check confirms the tag is a MIFARE Classic card. If the card is valid, the scanner authenticates block 4 with the default key and reads the 16-byte payload, stripping the null padding to recover the original ID string.
One issue that came up early was the scanner triggering multiple times if a card was held against it too long. The fix was to keep polling after a successful read until the card left the field:
while pn532.read_passive_target(timeout=0.5):
    time.sleep(0.1)
This holds the loop until the card is removed, so each physical tap only produces one scan event regardless of how long it sits there. After that, scan.py takes the card ID, searches the card list for a match, checks that the card is enabled, and then looks up the associated user before posting the check-in.
Accounts & Check-in Logic
Each member has a document in MongoDB with their name, ID, position, admin flag, score, and a running list of attendance entries. The Users class wraps the collection and handles all account operations. Passwords are hashed with SHA-512 before being stored, so plaintext credentials never touch the database.
self.collection.insert_one({
    "id": id,
    "name": name,
    "position": position,
    "admin": admin,
    "score": 0,
    "attendance": []
})
Score accumulates over time and is the main thing administrators look at when evaluating attendance.
Check-in and check-out are handled by the same scan. Tapping the card the first time opens an attendance entry for the day; tapping again closes it and adds the elapsed minutes to the student's score.
View full check_in logic
def check_in(self, id: str):
    filter = {"id": id}
    document = self.collection.find_one(filter)

    if not document:
        return

    for obj in document["attendance"]:
        if not obj["out"] and obj["date"] == datetime.now().strftime("%x"):
            obj["out"] = int(time.time())
            document["score"] += int((obj["out"] - obj["in"]) / 60)

            self.collection.replace_one(filter, document)
            return False

    document["attendance"].append({
        "date": datetime.now().strftime("%x"),
        "in": int(time.time()),
        "out": None
    })

    self.collection.replace_one(filter, document)
    return True
The function looks for an open attendance entry for today, meaning one where out is None. If it finds one, it sets the checkout time and calculates (out - in) / 60 to get minutes elapsed, which gets added to the score. If there is no open entry for today, it creates one. True means checked in, False means checked out.
Cards are managed through a separate Cards collection. The 6-digit ID written to the chip maps to one of these documents, which then points to the user account via user_id.
{
    "id": card_id,
    "user_id": user_id,
    "academic_year": academic_year,
    "expires": expires_date,
    "enabled": True
}
Flask API
The API covers everything the Pi and the admin panel need:
- Creating and updating member accounts
- Issuing and disabling cards
- Checking members in and out
- Querying attendance history and presence status
The routes are intentionally thin; all the actual logic lives in the Users and Cards classes. The check-in endpoint is a good example:
@views.route("api/check_in", methods=["POST"])
def check_in():
    data = request.get_json(silent=True)
    checked_in = users.check_in(data.get("id"))

    return jsonify({"status": 200, "response": "Checked in" if checked_in else "Checked out"})
Determining whether a member is currently present is handled by a dedicated is_present endpoint. It checks the most recent attendance entry for today and returns whether it has an open out field:
@views.route("api/is_present")
def is_checked_in():
    id = request.args.get("id")
    user = users.get({"id": id})

    if not user or not user.get("attendance"):
        return {"status": 200, "response": False}

    last_obj = user["attendance"][-1]
    if last_obj["date"] == datetime.now().strftime("%x") and not last_obj["out"]:
        return {"status": 200, "response": True}

    return {"status": 200, "response": False}
Admin routes are protected by a session-based admin_required decorator. Rather than storing admin credentials in MongoDB alongside member data, they are kept in a separate JSON file, which cleanly separates privileged access from the main data model.
def admin_required(func):
    @wraps(func)
    def decorated(*args, **kwargs):
        if "admin_id" not in session:
            return redirect("/login")
        return func(*args, **kwargs)

    return decorated
Kiosk Interface
The kiosk runs on the Raspberry Pi running Ubuntu connected to a monitor in the lab. Rather than having the page poll for changes every few seconds, I wanted it to update only when something actually happened. I used a library called eel, which launches Chromium in kiosk mode and creates a bidirectional bridge between Python and JavaScript.
eel_thread = threading.Thread(
    target=eel.start,
    args=("index.html",),
    kwargs={
        "host": "0.0.0.0",
        "port": 8000,
        "mode": "/snap/bin/chromium",
        "cmdline_args": ["--kiosk", "--no-sandbox", ...]
    },
    daemon=True
)
Functions decorated with @eel.expose are callable from JavaScript, and JavaScript functions registered with eel.expose() are callable from Python. After a successful scan, scan.py calls set_status with the result, which triggers changeStatus in the browser to show a banner with the member's name and whether they checked in or out. A few seconds later the page reloads back to the default state.
@eel.expose
def set_status(status, name):
    eel.changeStatus(status, name)
eel.expose(reloadPage);
function reloadPage() { window.location.reload(); }The default view shows a scrolling table of all team members with a green checkmark next to anyone currently marked as present. On page load, the frontend calls is_present for each member individually to build the table. This works well for a roster of this size, and it keeps the rendering logic simple and each member's status independently verifiable.
The table auto-scrolls at a slow, steady rate so the whole roster cycles through without anyone needing to touch anything. When it reaches the bottom it pauses briefly and resets to the top.
Security
A few things worth noting:
- The server ran on the staff WiFi network, so it was not reachable by students on the regular school network. I received permission from the school to deploy here.
- Cards expire after one academic year and have to be reissued. Any card can also be immediately disabled through the admin panel without deleting it, which preserves the historical record while preventing further use.
- The robotics lab closes at 5:30 pm meaning any student still marked as present at that time does not receive points for the day since the system expects an explicit check-out.